Add EC2 Workers - On-Demand and Spot
We have our EKS Cluster and worker nodes already, but we need some Spot Instances configured as workers. We also need a Node Labeling strategy to identify which instances are Spot and which are on-demand so that we can make more intelligent scheduling decisions. We will use AWS CloudFormation to launch new worker nodes that will connect to the EKS cluster.
This template will create a single ASG that leverages the latest feature to mix multiple instance types and purchase as a single K8s nodegroup. Check out this blog: New – EC2 Auto Scaling Groups With Multiple Instance Types & Purchase Options for details.
Retrieve the Worker Role name
First, we will need to collect the Role Name that is in use with our EKS worker nodes
echo $ROLE_NAME
Copy the Role Name for use as a Parameter in the next step. If you receive an error or empty response, expand the steps below to export.
INSTANCE_PROFILE_PREFIX=$(aws cloudformation describe-stacks | jq -r .Stacks[].StackName | grep eksctl-eksworkshop-eksctl-nodegroup)
INSTANCE_PROFILE_NAME=$(aws iam list-instance-profiles | jq -r '.InstanceProfiles[].InstanceProfileName' | grep $INSTANCE_PROFILE_PREFIX)
ROLE_NAME=$(aws iam get-instance-profile --instance-profile-name $INSTANCE_PROFILE_NAME | jq -r '.InstanceProfile.Roles[] | .RoleName')
echo "export ROLE_NAME=${ROLE_NAME}" >> ~/.bash_profile
# Example Output
eksctl-eksworkshop-eksctl-nodegro-NodeInstanceRole-XXXXXXXX
Launch the CloudFormation Stack
We will launch the CloudFormation template as a new set of worker nodes, but it’s also possible to update the nodegroup CloudFormation stack created by the eksctl tool.
Click the Launch button to create the CloudFormation stack in the AWS Management Console.
| Launch template | ||
|---|---|---|
| EKS Workers - Spot and On Demand | Launch | Download |
Confirm the region is correct based on where you’ve deployed your cluster.
| Parameter | Value |
|---|---|
| Stack Name: | eksworkshop-spot-workers |
| Cluster Name: | eksworkshop-eksctl (or whatever you named your cluster) |
| ClusterControlPlaneSecurityGroup: | Select from the dropdown. It will contain your cluster name and the words ‘ControlPlaneSecurityGroup’ |
| NodeInstanceRole: | Use the role name that copied in the first step. (e.g. eksctl-eksworkshop-eksctl-nodegro-NodeInstanceRole-XXXXX) |
| NodeImageId: | Visit this link and select the non-GPU image for your region - Check for empty spaces in copy/paste |
| KeyName: | SSH Key Pair created earlier or any valid key will work |
| VpcId: | Select your workshop VPC from the dropdown |
| Subnets: | Select the public subnets for your workshop VPC from the dropdown |
| BootstrapArgumentsForOnDemand: | --kubelet-extra-args --node-labels=lifecycle=OnDemand |
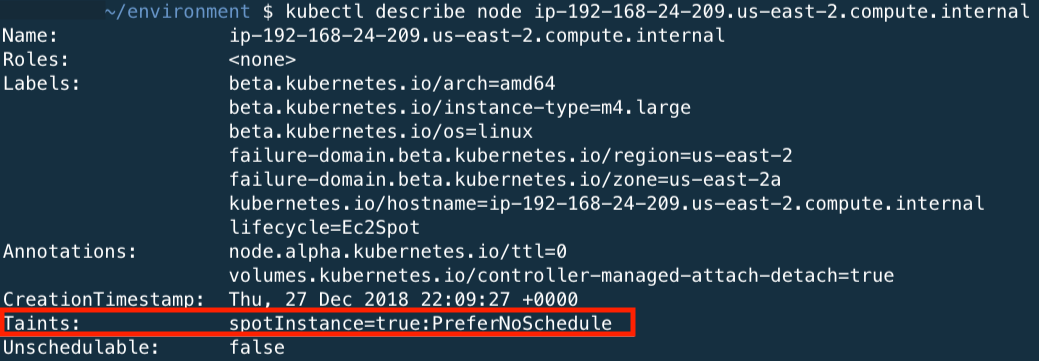
| BootstrapArgumentsForSpotFleet: | --kubelet-extra-args '--node-labels=lifecycle=Ec2Spot --register-with-taints=spotInstance=true:PreferNoSchedule' |
What’s going on with Bootstrap Arguments?
The EKS Bootstrap.sh script is packaged into the EKS Optimized AMI that we are using, and only requires a single input, the EKS Cluster name. The bootstrap script supports setting any kubelet-extra-args at runtime. We have configured node-labels so that kubernetes knows what type of nodes we have provisioned. We set the lifecycle for the nodes as OnDemand or Ec2Spot. We are also tainting with PreferNoSchedule to prefer pods not be scheduled on Spot Instances. This is a “preference” or “soft” version of NoSchedule – the system will try to avoid placing a pod that does not tolerate the taint on the node, but it is not required.
You can leave the rest of the default parameters as is and continue through the remaining CloudFormation screens. Check the box next to I acknowledge that AWS CloudFormation might create IAM resources and click Create
The creation of the workers will take about 3 minutes.
Confirm the Nodes
Confirm that the new nodes joined the cluster correctly. You should see 2-3 more nodes added to the cluster.
kubectl get nodes
 You can use the node-labels to identify the lifecycle of the nodes
kubectl get nodes --show-labels --selector=lifecycle=Ec2Spot
The output of this command should return 2 nodes. At the end of the node output, you should see the node label lifecycle=Ec2Spot

Now we will show all nodes with the lifecycle=OnDemand. The output of this command should return 1 node as configured in our CloudFormation template.
kubectl get nodes --show-labels --selector=lifecycle=OnDemand

You can use the kubectl describe nodes with one of the spot nodes to see the taints aaplied to the EC2 Spot Instances.
